
Lets face it, we all wanted a folder on our computer that we wished no one else have access to. A folder that holds our very important work files, personal email or chat logs or may be our collection of naughty videos and pictures, needs a level of security that can give us a peaceful sleep. But how do we actually protect our private folder, well for one, we could use zillions of software available for this purpose. My personal favorite among those zillions of software is TrueCrypt. TrueCrypt is a free, open source software that is available for all platforms. What TrueCrypt does is, it encrypts an entire partition or a USB flash drive, with such a strong algorithm that even if FBI happens to get their hands on your private data, they will have to scratch their grey cells for months to break it!! But, what if you don't want to use any third party software ? Are our Operating Systems equipped with any such mechanisms that will allow us to create a safety vault for our private files ? Read on..
In Mac OS X, there exists Disk Utility that will help us create an encrypted partition and in Windows, however we will use a smart way of redirection to a system folder. Let me first begin with Mac OS X, Windows will follow up in my Part 2 of this article. Follow the exact steps in Mac OS X Leopard :
- Launch the Disk Utility from the /Applications/Utilities folder
- Select New Disk Image from the file menu
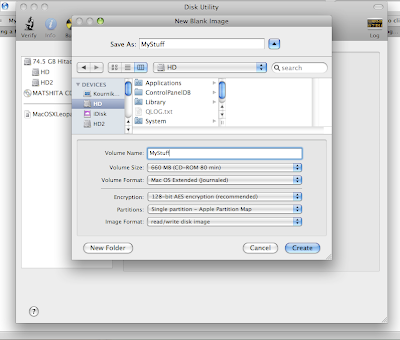
- You will be required to enter a name for the encrypted disk that will be created, lets name it MyStuff. Remember that MyStuff will be a disk image and hence will be saved as MyStuff.dmg.
- Choose the location where you will like the disk image to be created, by selecting a location from the device listing on the left.
- For the Volume Size, select a size that will have enough space to fit in all your stuff, for reference purpose I chose 660MB, you should choose a higher value.
- For Volume Format, select Mac OS Extended (Journaled).
- For Encryption, choose either 128 bit AES or 256 bit AES, I don't have a problem with FBI so I chose 128 bit AES Encryption.
- For Partition, choose Single Partition- Apple Partition Map
- For Image Format, you choose read/write disk image, so that you can add and delete contents to MyStuff.
- Next click on the Create button.
- When prompted, enter a password. Remember your password is your key, so make it as jumbled as possible so that guessing the password makes no sense. Use a good combination of characters, numbers and special characters with both upper and lower case.
- Click OK and your disk will be created at the location specified.
NOTE: Never click on Remember password or add to keychain as this will enable anyone to access your image just by clicking it.
Now your safety vault MyStuff.dmg is created and every time you want to access it, just double click on it and enter the password. When you are done with it just select the mounted MyStuff and press CMD + E to eject or simply reboot/shutdown. Now dump all your all your Playmate videos and have a peaceful sleep.


1 comment:
I am really interested for this article. Its a nice article. I want to know something about this article. So please give me some information about this article.
outlook junk email folder
Post a Comment